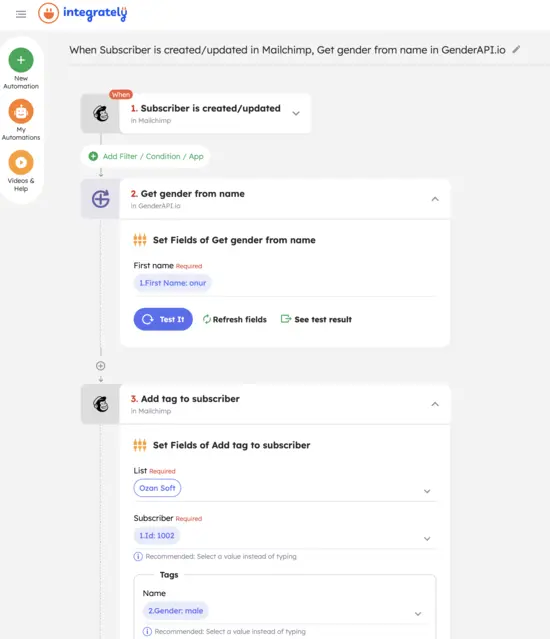
Automation map
Connect the trigger, enrichment and destination
Step-by-Step Guide to Using the GenderAPI Integrately Integration
Step 1: Setting Up the Trigger for New Subscriber in Mailchimp
In this first step, we configure a trigger in Integrately to activate the workflow whenever a new subscriber is created or updated in Mailchimp.
Choose the Trigger App: Select Mailchimp as the app to initiate this automation.
Set Trigger Event: Choose the event Subscriber is created/updated. This ensures that the workflow is triggered anytime there is a new addition or update to the subscriber list.
Select the Mailchimp audience: Choose the audience that supplies the subscriber record; do not copy the example account name from an older screenshot.
Load a representative Mailchimp record and verify the available fields before mapping them. Use test data rather than production customer data while configuring the automation.
Step 2: Retrieve Gender Information Using GenderAPI
With the trigger established, the next step is to set up an action to retrieve gender information based on the subscriber’s details using GenderAPI.
Choose the Action App: Select GenderAPI from the available options in Integrately.
Set Action Event: Choose Get Gender from Name as the action event to allow the GenderAPI to determine gender based on the subscriber's name.
Connect: Click Connect and ensure your GenderAPI account is linked. If this is the first time, you’ll need to input your API key.
Map the input: Map Mailchimp's first-name field to the GenderAPI name action and keep the returned probability available for review.
This action sends the mapped first name to GenderAPI and returns a probabilistic result that can be used by the next step.
Step 3: Add Gender Tag to the Subscriber in Mailchimp
Choose the Action App: Add another action and select Mailchimp.
Choose the destination action: Select the appropriate Mailchimp contact update and decide how unknown or low-probability results should be handled before mapping a tag.
Connect: Click Connect and ensure your existing Mailchimp account is linked.
Map the output: Map only reviewed result values to the chosen Mailchimp field or tag and preserve an unset path for uncertain results.
Step 4: Test the Workflow
After completing the setup, it’s essential to test the workflow to ensure it functions as expected:
Add a New Subscriber: Create a new subscriber entry in Mailchimp.
Verify the automation: Confirm that the trigger runs, GenderAPI returns a response and the intended Mailchimp field is updated without overwriting unrelated data.
After the test succeeds, enable the automation and continue monitoring failures, quotas, credits and field changes in both services.
Configuration reference
Verify the mapped data before activation